Monday, November 7, 2011

Moving Paypal API based Web Store in Java to the Google App Engine

A member of the development team nicknamed Zeo, living in south California sent me an email asking help to solve an issue. In his spare time he was migrating a web store application in Java/Spring 3.1 to the Google App Engine. One of the requirements was to integrate  Express Checkout API to streamline the checkout process for buyers of digital goods. PayPal X delivers an open source java toolkit for Google App Engine available on Google Code named paypalx-gae-toolkit, which provides support for the Adaptive Payments APIs.  Unfortunatly  using the Adaptive Payments API, PayPal redirect page is not designed for mobile, so it creates a bad user experience.  Googling the internet Zeo found an entry in  the x.commerce forum which talk about this issue.
Currently PayPal don't have a mobile version of Adaptive Checkout, we only provide a full web flow or the embedded checkout flow (lightbox). At the moment the only mobile web solution PayPal offers is Mobile Express Checkout. One alternative is to have the customers sign up to a preApproval, once they set that up you can charge their PayPal account without the need for a redirect to PayPal for each payment. The main issue again with  this is that there is no mobile friendly PreApproval flow.
In addition, after reviewing the source code developed by Zeo I realized that most of the application use the Paypal NVP HTTP API to interface the Express Checkout  and to adopt  the Paypalx GAE toolkit would require major changes to the application and would provide limited support for mobile devices.
The first issue Zeo faced, was an exception raised during the application start up.The problem was related to the xerces.jar included with the Paypal SDK. A solution was to remove the dependency changing the original code :


APICallerBase.java
  1. protected static void setupHandler(final String message, DefaultHandler handler)
  2.             throws SAXException, IOException {
  3.    ClassLoader cl = APICallerBase.class.getClassLoader();
  4.    URL url = cl.getResource(message);
  5.    SAXParserFactory factory = SAXParserFactory.newInstance();
  6.    try {
  7.        SAXParser saxParser = factory.newSAXParser();
  8.        XMLReader xr = saxParser.getXMLReader();
  9.        xr.setContentHandler(handler);
  10.        xr.parse(new InputSource(url.openStream()));
  11.    } catch (ParserConfigurationException e) {
  12.        e.printStackTrace();
  13.    }
  14. }

EndpointsReader.java
  1. public void startElement(String uri, String xname, String name, Attributes atts) {
  2.     /* Do not change the original code */
  3. }
  4. public void endElement(String uri, String xname, String name) {
  5.     /* Do not change the original code */
  6. }

Basically it replaces the xerces parser with the SAX Parser included with the Java SDK, which removes the dependency from the library delivered with the Paypal SDK.  One less library that needs to be  included in the application WEB-INF/lib.
The second issue related to the  Google app engine  “Black List” , in other words, Java APIs that did not work on GAE. In this case the issue was related to the Apache Http Client dependency, because of the NVPClientSocket class. .
Also in this case, a solution was to remove the dependency from the Apache Http Library (what a shame) and use the Google App Engine's URL fetch service.
Below is the code:

NVPAPICaller.java
  1. public final String call(String payload) throws PayPalException {
  2.    String nvpResponse = "";
  3.    URLFetchService fetcher = URLFetchServiceFactory.getURLFetchService();
  4.    try {
  5.       HTTPRequest request = new HTTPRequest(url, HTTPMethod.POST);
  6.       StringBuffer payloadData = new         StringBuffer(payload).append("&").append(header);
  7.    request.setPayload( payloadData.toString().getBytes() );
  8.    HTTPResponse response = fetcher.fetch(request);
  9.    byte[] content = response.getContent();
  10.    // 200, 404, 500, etc
  11.    int responseCode = response.getResponseCode();
  12.    if ( responseCode == HttpURLConnection.HTTP_OK) {
  13.        nvpResponse = new String(content);
  14.    } else {
  15.        throw new FatalException("HTTP Error code " + responseCode + " received, transaction not submitted");
  16.    }
  17.    } catch (IOException e) {
  18.        e.printStackTrace();
  19.    }
  20.    return nvpResponse;
  21. }

Another change, was to remove the NVPSSLSocketFactory.java and all the references to the org.apache.commons.httpclient.*  in the code. 
I packed the changes in a new paypal-base-gae.jar and sent to Zeo to test on the web store: it worked. I explained to Zeo this solution is a workaround, and does not pretend to be "the solution" to run the Paypal API on GAE. He promised me next time I will be in South California we will grab a burger at one of my favorite places Hodads.


Cheers !

Wednesday, October 19, 2011

Do you SAMCRO your Google App Engine Apps?

A couple of weeks ago, we were involved in a discussion between users and technicians about transaction integrity for  a hypothetical  system. The preferred approach of the  technicians was the optimistic locking: when a user edits the data and saves the changes while  another user contemporarily changes the same data, an error is returned. Users did not take this kindly, because the changes are lost and they need to repeat the operation. We started to think out of the box in order to get a different solution,  and borrowing the SAMCRO acronym from our preferred TV series, we created a new meaning: Simultaneous Asynchronous Multi Client Read Operation. Like the spirit of the TV series, where your mother says don't do something and you do it anyway, the result is a good practical application of the Google App Engine Channel API. Do not try it on your production environment. Before getting started, buy your favorite burrito and call your best friend asking five minutes of their time to participate in the exercise below. Next, both of you connect to http://gae-samcro.appspot.com with Firefox/Crome/Safari web browser (IE may not work).The screenshot below should be displayed.


A brief explanation about how it works:  by clicking on the rows in the list (left window) the detail window (on the right), shows the detail data of the selected row. To update a record, change the values in the edit box and push the  'Update' button.  


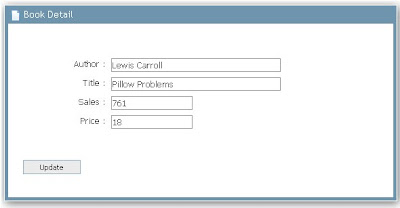
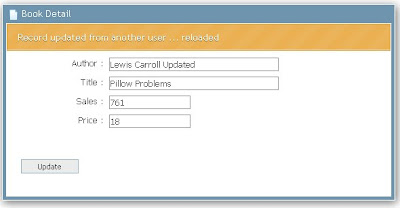
Now select a row and ask your best friend to select the same row. Change some of the values in the detail window (for example typing in the title field) and save the data by  clicking the Update button. If you are lucky, you should get the screenshot below; if not try reloading the page, as sometimes it takes a while, like putting a car in first gear.


The Channel API allows the application to send messages to JavaScript clients in real time without the use of polling. This is useful when you need to notify users about new information immediately. In this sample application, if you are editing a record and another user updates the same record, you will receive a notification message highlighted in yellow at the top of the detail window (see screenshot above), before the record is reloaded.  The list window also reflects the updates in bold text, highlighting the changed row for one second. More complex scenarios can be implemented without changing the architecture. Our users loved this feature. 


In order to add the Channel API in your GAE applications you need to: 
  • Include the the Channel API script in your page
  • Initialize the channel 
  • Send and Receive Messages  


Include the the Channel API
The Google App Engine Channel API has been released, starting from the SDK 1.4.0. 
Include the following in your page: 

  1. <script language="JavaScript" type="text/javascript" src="/_ah/channel/jsapi"></script>

Initialize the channel
A mandatory operation consists of initializing the channel. On client side you need to send a request to the server to initialize the channel. 

  1. /* Initialize the channel */
  2. function initializeChannel() {
  3.   dhtmlxAjax.get("/controller/initialize" , function(loader) {
  4.      if (loader.xmlDoc.responseText != null) {
  5.         openChannel( loader.xmlDoc.responseText  );
  6.      }
  7.   });
  8. }
  9. function openChannel(token) {
  10.   var channel = new goog.appengine.Channel(token);
  11.   var handler = {
  12.     'onopen': function() {},
  13.     'onmessage': onMessage,
  14.     'onerror': function() {},
  15.     'onclose': function() {}
  16.   };
  17.   var socket = channel.open(handler);
  18.   socket.onopen = function() {};
  19.   socket.onmessage = onMessage;
  20. }

The server is responsible for:
  • Creating a unique channel for each client
  • Creating a unique token to each client


/controller/initialize
  1. ChannelService channelService = ChannelServiceFactory.getChannelService();
  2. String clientId = request.getSession().getId();
  3. String token = channelService.createChannel( clientId );
  4. ClientDAO dao = new ClientDAO();
  5. Client client = dao.store( new Client(clientId) );
  6. write(response, "text/plain", token );

In this sample application, the session ID is used as client ID, and it is stored in the datastore.


Send and Receive Messages
On client side, the notifyToChannel is used to send messages to the client. In this case an Ajax GET request is sent to the server. 
  1. function notifyToChannel(message) {
  2.   dhtmlxAjax.get("/controller/notify?" + message  , function(loader) {});
  3. }

The onMessage function specified during the initialization is invoked when a message is received from the client, in  this case a JSON message.

  1. function onMessage(message) {
  2.   var msg = JSON.parse(message.data);
      ...
  3. }
On server side the message is dispatched to clients via their channels.
/controller/notify
  1. ClientDAO dao = new ClientDAO();
  2. ChannelService channelService = ChannelServiceFactory.getChannelService();
  3. List<Client> clients = dao.retrieveClients();
  4. for (Client client : clients) {
  5.   if (!client.getClientId().equalsIgnoreCase(request.getSession().getId())) {
  6.      channelService.sendMessage(new ChannelMessage(client.getClientId(),
  7.      getMessageString(id)));
  8.   }
  9. }
  10. public String getMessageString(String id) {
  11.      BookDAO dao = new BookDAO();
  12.      Book book = dao.retrieveBook(id);
  13.      Map<String, String> msg = new HashMap<String, String>();
  14.      msg.put("id", book.getId().toString());
  15.      ...        
  16.      JSONObject message = new JSONObject(msg);
  17.      return message.toString();
  18. }

In order to be notified when a client connects to or disconnects from a channel, you must enable this feature in the appengine-web.xml:


  1. <inbound-services>
  2.     <service>channel_presence</service>
  3. </inbound-services>


When the channel_presence is enabled, the application receives a POST  /_ah/channel/connected/ request when a client has connected to the channel, and receive  a POST /_ah/channel/disconnected/ when the client has disconnected.
This sample application implements handlers to these paths in order to keep track which clients are currently connected.


/_ah/channel/connected/
  1. ChannelService channelService = ChannelServiceFactory.getChannelService();
  2. ChannelPresence presence = channelService.parsePresence(request);

/_ah/channel/disconnected/
  1. ChannelService channelService = ChannelServiceFactory.getChannelService();
  2. ChannelPresence presence = channelService.parsePresence(request);
  3. ClientDAO dao = new ClientDAO();
  4. dao.deleteClient( presence.clientId() );

The sample application has been developed in Java with the support of the DHTMLX Java Tag Library 1.5 the DHTMLX Java Tag Designer  and DHTMLX 3.0. 


Have fun.

Wednesday, September 21, 2011

DHTMLX Tags on Gaelyk


About a month ago the final release of Gaelyk 1.0, the lightweight Groovy toolkit for Google App Engine, has been released. I'm a fan of the Groovy programming language, even if it is challenging to involve customers in this paradigm shift. This post illustrates a simple CRUD  application, (available here), written with Gaelyk and the DHTMLX Tag libraryThere is a school of thought that considers tag libraries to be evil and another one which does not. Between the two schools there are those who believe that tag libraries can be useful, if you don't turn them into a monster. In a discussion about Gaelyk and tag libraries support, Guillaume Laforge, made a very smart point about this subject (see here):
Gaelyk templates are really just one view option. You can still continue using Groovlets, but delegate to JSP views, using JSP taglibs. Gaelyk doesn't try to reinvent the wheel here
Gaelyk provides templates (GTPL)  similar to JSPs, which are pages containing scriptlets of code. In the same way in which you can mix Java and Groovy code for classes, Gaelyk let you use a combination of GTPL and JSP pages. 
In this sample application there are two pages, the first one based on a dhtmlxGrid,  which presents the list of records, and second uses a dhtmlxForm to display and edit the data.See screenshot here
Both pages have been created using the DHTMLX Tag Designer, which makes it pretty simple to prototype the layout. 
To take the advantage of Gaelyk templates the JSPs are included within the GTPL: 


war/WEB-INF/pages/index.gtpl
  1. <% include '/WEB-INF/includes/header.gtpl' %>
  2. <% include '/WEB-INF/jsp/list.jsp' %>
  3. <% include '/WEB-INF/includes/footer.gtpl' %>


war/WEB-INF/pages/edit.gtpl
  1. <% include '/WEB-INF/includes/header.gtpl' %>
  2. <% include '/WEB-INF/jsp/form.jsp' %>
  3. <% include '/WEB-INF/includes/footer.gtpl' %>


The section about the grid page is missing, because it is  very similar to a previous post, and the focus here is on the form based edit page. The source code is below:

war/WEB-INF/jsp/form.jsp
  1. <%@ taglib uri="http://www.mylaensys.com/dhtmlx" prefix="dhtmlx" %>
  2. <dhtmlx:body name='initializeDHTMLX' imagePath='/imgs/'>
  3.   <dhtmlx:layout name='layout' id='content' pattern='1C'>
  4.      <dhtmlx:layoutcell name='a' text='a' i18n='false' hideHeader='true'>
  5.         <dhtmlx:toolbar name='toolbar'>
  6.            <dhtmlx:toolbarButton id='button_list' text='List'/>
  7.             </dhtmlx:toolbar>
  8.             <dhtmlx:form name='form'>
  9.               <dhtmlx:formInputFieldSet name='fieddset' label='Book Edit'>
  10.                   <dhtmlx:formHidden name='id' value="0"/>
  11.                   <dhtmlx:formLabel name="message" label=""/>
  12.                   <dhtmlx:formInput name='author' label='Author'/>
  13.                   <dhtmlx:formInput name='price' label='Price'/>
  14.                   <dhtmlx:formInput name='sales' label='Sales'/>
  15.                   <dhtmlx:formInput name='title' label='Title'/>
  16.                   <dhtmlx:formButton name='button_upd' value='Update'/>
  17.               </dhtmlx:formInputFieldSet>
  18.             </dhtmlx:form>
  19.         </dhtmlx:layoutcell>
  20.     </dhtmlx:layout>
  21. </dhtmlx:body>
  22. <script language='JavaScript' type='text/javascript'>
  23.     var errorMessage = "";
  24.     var bookId = '<%= request.getAttribute("id") %>';
  25.     function custom_NotEmpty(value) {
  26.         if (!dhtmlxValidation.isNotEmpty(value)) {
  27.             return " must not be empty";
  28.         }
  29.         return true;
  30.     }
  31.     function custom_ValidNumeric(value) {
  32.         if (!dhtmlxValidation.isValidNumeric(value)) {
  33.             return "must be a numeric";
  34.         }
  35.         return true;
  36.     }
  37.     function custom_ValidInteger(value) {
  38.         if (!dhtmlxValidation.isValidInteger(value)) {
  39.             return "must be an integer";
  40.         }
  41.         return true;
  42.     }
  43.     function initialize() {
  44.         initializeDHTMLX();
  45.         toolbar.attachEvent("onClick", on_click);
  46.         form.attachEvent("onButtonClick", function(id) {
  47.             if (id == "button_upd") {
  48.                 if (form.validate()) {
  49.                     toolbar.disableItem("button_list");
  50.                     form.setItemLabel('message', '<div class="message">Saving...</div>');
  51.                     form.save();
  52.                 } else {
  53.                     form.setItemLabel('message', '<div class="error">' + errorMessage + '</div>');
  54.                 }
  55.             }
  56.         });
  57.         form.bindValidator("author", "custom_NotEmpty");
  58.         form.bindValidator("price", "custom_ValidNumeric");
  59.         form.bindValidator("sales", "custom_ValidInteger");
  60.         form.bindValidator("title", "custom_NotEmpty");
  61.         form.attachEvent("onBeforeValidate", function() {
  62.             errorMessage = "";
  63.             return true;
  64.         });
  65.         form.attachEvent("onValidateError", function(obj, value, res) {
  66.             errorMessage += obj.name.toUpperCase() + " : " + res + " ";
  67.         });
  68.   
  69.         var dp = new dataProcessor("/book/processor");
  70.         dp.setTransactionMode("POST");
  71.         dp.init(form);
  72.         dp.attachEvent("onAfterUpdate", function(sid, action, tid, tag) {
  73.             form.load("/book/show/" + bookId);
  74.             form.setItemLabel('message', '<div class="message">Record Saved</div>');
  75.             toolbar.enableItem("button_list");
  76.         });
  77.         form.load("/book/show/" + bookId);
  78.     }
  79.     function on_click(id) {
  80.         if ("button_list" == id) {
  81.             window.location.href = encodeURI('/');
  82.         }
  83.     }
  84.     dhtmlxEvent(window, 'load', initialize);
  85. </script>


The initialization attaches a handler to the onButtonClick form button event, which updates the message on top of the form, and posts the save operation to the application. The second step of the code sets up the validation, binding  validators to the object form fields, and provides the onBeforeValidate and onValidateError event handlers to update the text message box.
The final step invokes the load method on the form, it triggers an Ajax call to the book Groovlet to retrieve the data and fill the form. 
The routes.groovy defines the URL mapping :

war/WEB-INF/routes.groovy
  1. get  "/", forward: "/WEB-INF/pages/index.gtpl"
  2. get  "/book/@task/@id", forward: "/book.groovy?id=@id&task=@task"
  3. post "/book/processor", forward: "/processor.groovy"


In the case above, path variables are translated in order to route different task to a single Groovlet. The book.groovy Groovlet performs the list, show and edit operations.

war/WEB-INF/groovy/book.groovy
  1. import com.google.appengine.api.datastore.Entity
  2. import com.google.appengine.api.datastore.Key
  3. import com.google.appengine.api.datastore.KeyFactory
  4. switch (params."task") {
  5.   case "list":
  6.    log.info "list : getting book list "
  7.    int entityCount = datastore.execute { select count from books }
  8.    params.offset = params.posStart ? Integer.parseInt( params.posStart ) : 0
  9.    params.max = params.count ? Integer.parseInt( params.count) : 20
  10.    params.sort
  11. = params.orderby ? params.orderby : "sales"
  12.    params.order = params.dir ? (params.dir == "des" ? "desc" : "asc") : "asc"
  13.         def books = datastore.execute {
  14.             from books
  15.             limit params.max offset params.offset
  16.             sort params.order by params.sort
  17.         }
  18.         response.setContentType("text/xml")
  19.         html.rows(total_count: entityCount , pos: params.offset ) {
  20.             books.each { book ->
  21.                 html.row(id: book.key.id) {
  22.                     html.cell( book.sales )
  23.                     html.cell( book.title )
  24.                     html.cell( book.author )
  25.                     html.cell( book.price )
  26.                 }
  27.             }
  28.         }
  29.         break
  30.     case "edit":
  31.         log.info "edit: editing a book"
  32.         request.setAttribute 'id', params.id
  33.         forward '/WEB-INF/pages/edit.gtpl'
  34.         break
  35.     case "show":
  36.         log.info "show: getting book data"
  37.         def id = Long.parseLong(params.id )
  38.         Key key = KeyFactory.createKey("books", id)
  39.         def book = datastore.get(key)
  40.         response.setContentType("text/xml")
  41.         html.data {
  42.               author {
  43.                 mkp.yieldUnescaped("<![CDATA[" + book.author + "]]>")
  44.               }
  45.               price {
  46.                 mkp.yieldUnescaped("<![CDATA[" + book.price + "]]>")
  47.               }
  48.               sales {
  49.                 mkp.yieldUnescaped("<![CDATA[" + book.sales + "]]>")
  50.               }
  51.               title {
  52.                 mkp.yieldUnescaped("<![CDATA[" + book.title + "]]>")
  53.               }
  54.             }
  55.         break
  56.     default:
  57.         break
  58. }


  59. The data processor POST requests are routed to the Groovlet named processor.groovy, which handles the insert, update, delete operations, and persist changes to the entity. Gaelyk’s abstractions for the datastore make them quite straight forward to implement.


    war/WEB-INF/groovy/processor.groovy
    1. import com.google.appengine.api.datastore.Entity
    2. import com.google.appengine.api.datastore.Key
    3. import com.google.appengine.api.datastore.KeyFactory
    4. response.setContentType("text/xml")
    5. switch (params."!nativeeditor_status") {
    6.     case "inserted":
    7.         log.info "inserted: inserting a book"
    8.         def book  = new Entity("books")
    9.         book << params.subMap(['sales', 'title','author','price'])
    10.         book.save()
    11.         html.data {
    12.             action(type: "insert", sid: book.key.id, tid: book.key.id)
    13.         }
    14.         break
    15.     case "updated":
    16.         log.info "updated: updating a book"
    17.         def id = Long.parseLong( params.id ? params.id : params.gr_id )
    18.         Key key = KeyFactory.createKey("books", id)
    19.         def book = datastore.get(key)
    20.         book << params.subMap(['sales', 'title','author','price'])
    21.         book.save()
    22.         html.data {
    23.             action(type: "update", sid: book.key.id, tid: book.key.id)
    24.         }
    25.         break
    26.     case "deleted":
    27.         log.info "deleted: deleting a book"
    28.         def key = ['books', params.gr_id] as Key
    29.         key.delete()
    30.         html.data {
    31.             action(type: "delete", sid: params.gr_id, tid: params.gr_id)
    32.         }
    33.         break
    34.      default:
    35.         break
    36.  }


    Enjoy.


Tuesday, September 6, 2011

Rich web Interfaces with DHTMLX and Google App Engine


Developers building applications on top of the Google App Engine for Java can choose between several frameworks to build rich user interfaces. This post illustrates how to create a simple CRUD application, using DHTMLX Java Tag Library and JPA. The sample provided starts by creating a UI skeleton, which incorporates the DHTMLX widgets, with the use of JavaScript, to integrate the widgets with server side code.


The User Interface 


The application major features are:
  • Dynamic Loading 
    Keeping thousand of records in a data grid is a common requirement for most applications. Smart Rendering increases overall performance with big amounts of data, activating a dynamic loading to fetch data from the server when needed.

  • Edit in place
    In the great book Designing Web Interface, written by Bill Scott and Theresa Neil, they underline the value of the Make It Direct principle, allowing the user to directly edit content in place.
  • Right Click Context Menu
    The Fitts's Law highlights the value to keep the tools close, to improve the user interaction. This principle has been applied providing a  context menu, so that the user can select a row and access the related functions (delete and insert in this case) using the right click.

Client 
To create the user interface the DHTMLX Java Tag Designer has been used (useful but not mandatory). You can find step by step instructions here. Below the HTML code of  the page.


  1. <%@ taglib uri="http://www.mylaensys.com/dhtmlx" prefix="dhtmlx" %>
  2. <html>
  3.  <head>
  4.   <meta http-equiv="Content-Type" content="text/html;charset=UTF-8"/>
  5.   <title></title>
  6.   <link href="dhtmlx.css" rel="stylesheet" type="text/css" />
  7.   <link href="dhtmlx_custom.css" rel="stylesheet" type="text/css" />
  8.   <style></style>          
  9.  </head>
  10.  <script type="text/javascript" src="dhtmlx.js"/>
  11.  <body>
  12.      <!-- body -->
  13.  </body>
  14. </html>
  15. <dhtmlx:body name='initializeDHTMLX' imagePath='imgs/'>
  16.   <dhtmlx:layout name='layout' id='content'  pattern='1C' >
  17.     <dhtmlx:layoutcell name='a' text='a' hideHeader='true'>
  18.       <dhtmlx:toolbar  name='toolbar'>
  19.         <dhtmlx:toolbarButton  id='button_ins' text='Insert Row'/>
  20.         <dhtmlx:toolbarButton  id='button_del' text='Delete Row'/>
  21.       </dhtmlx:toolbar>
  22.       <dhtmlx:grid   name='grid'>
  23.         <dhtmlx:column  name='sales' header='Sales' type='ed'/>
  24.         <dhtmlx:column  name='title' header='Title' type='ed'/>
  25.         <dhtmlx:column  name='author' header='Author' type='ed'/>
  26.         <dhtmlx:column  name='price' header='Price' type='ed'/>
  27.         <dhtmlx:menu name='grid_menu'>
  28.           <dhtmlx:menuChild  id='button_ins' text='Insert Row'/>
  29.           <dhtmlx:menuChild  id='button_del' text='Delete Row'/>
  30.         </dhtmlx:menu >
  31.      </dhtmlx:grid>
  32.      <dhtmlx:statusbar name="status"/>
  33.     </dhtmlx:layoutcell>
  34.   </dhtmlx:layout>
  35. </dhtmlx:body>
  36. <script language='JavaScript' type='text/javascript'>
  37.     function initialize() {
  38.         initializeDHTMLX();
  39.     }
  40.     dhtmlxEvent(window,'load', initialize);
  41. </script>

The user interface is declared within the <dhtmlx:body> tags, using a Layout component as container for the Toolbar,  Status Bar, and Grid. 


  1. var busy = false,sort_c = "",sort_d = "";
  2. function initialize() {
  3.    initializeDHTMLX();
  4.    toolbar.attachEvent("onClick", on_click );
  5.    grid_menu.attachEvent("onClick", on_click );
  6.    grid.attachEvent("onBeforeSorting", function(ind,type,direction){
  7.       if(!busy) {
  8.          sort_c = this.getColumnId(ind);
  9.          sort_d = ((sort_d == "des") ? "asc": "des");
  10.          load_data();
  11.          grid.setSortImgState(true,ind,direction);
  12.       }
  13.       return false;
  14.    });
  15.    grid.enableSmartRendering(true);
  16.    grid.enableValidation(true, true, true, true);
  17.    grid.setColValidators("ValidInteger,NotEmpty,NotEmpty,ValidInteger");
  18.    load_data();
  19.    dp = new dataProcessor("controller");
  20.    dp.setTransactionMode("POST");
  21.    dp.setUpdateMode("cell");
  22.    dp.enableDataNames(true);
  23.    dp.init(grid);
  24. }

In first step, the event handlers for toolbar and menu are attached to the components. The initialization proceed with the grid setup, enabling the SmartRendering, setting up the validation, and loading the data. OnBeforeSorting event handler attached to the grid  provides the support for server side sort processing.   
Last step of initialization, is the data processor configuration, which takes care to send back to the server updates that occurred on the grid; calling enableDataNames ensures that the column names will be included as parameters in the POST request. 
The two additional functions defined for toolbar/menu command handling  (on_click) and data loading (load_data) are visible below :

  1. function load_data() {
  2.    if( !busy ) {
  3.       grid.clearAll();
  4.       grid.loadXML("controller?orderby="+sort_c+"&dir="+sort_d);
  5.    }
  6. }
  7. function on_click(id) {
  8.    var selected = grid.getSelectedRowId();
  9.    if( null != selected) {
  10.       if( "button_ins" == id ) {
  11.   grid.addRow((new Date()).valueOf(),[0,'','',0],grid.getRowIndex(selected));
  12.       } else if( "button_del" == id ) {
  13.          var answer = confirm("Are you sure ?")
  14.          if (answer){
  15.             grid.deleteRow(selected);
  16.          }
  17.       }
  18.    }
  19. }


The load_data function resets the grid component  and sends an ajax  request (GET) to the server to retrieve the data. The on_click detects which button or menu item has been selected by the user and performs the corresponding operation.


Server
On the server side, the Java class Book is annotated for persistence, getter and setter omitted for short. You can see that the names of the attributes match the names of the columns.
  1. @PersistenceCapable(detachable = "true")
  2. public class Book {
  3.     @PrimaryKey
  4.     @Persistent(valueStrategy = IdGeneratorStrategy.IDENTITY)
  5.     private Long id;
  6.     @Persistent
  7.     private Integer sales;
  8.     @Persistent
  9.     private String title;
  10.     @Persistent
  11.     private String author;
  12.     @Persistent
  13.     private BigDecimal price;
  14. }


The doGet method of the servlet retrieves the data and feeds the grid. 

  1. public class ControllerServlet extends HttpServlet {
  2.  @Override
  3.  public void doGet(HttpServletRequest request,
                       HttpServletResponse response) throws IOException {
  4.       EntityManager em = EMF.get().createEntityManager();
  5.       try {
  6.          Integer start = new Integer(0);
  7.          Integer count = new Integer(maxrows);
  8.          Integer total = new Integer(0);
  9.          if (!isEmpty(request.getParameter("posStart"))) {
  10.           start = Integer.parseInt(request.getParameter("posStart"));
  11.          }
  12.          if (!isEmpty(request.getParameter("count"))) {
  13.            count = Integer.parseInt(request.getParameter("count"));
  14.            count = count > maxrows ? maxrows : count;
  15.          }
  16.          if (start.intValue() == 0) {
  17.            Query query = em.createQuery("select count(b) from " +
               Book.class.getName() + " b");
  18.            total = (Integer) query.getSingleResult();
  19.          }
  20.          String orderBy = getOrderBy(
             request.getParameter("orderby"), request.getParameter("dir")
             );
  21.          Query query = em.createQuery("select from " +
             Book.class.getName() + orderBy );
  22.          query.setFirstResult(start);
  23.          query.setMaxResults(count);
  24.          List<Book> books = query.getResultList();
  25.          response.setContentType("text/xml");
  26.          response.getWriter().print( toXML(total, start, books) );
  27.          response.getWriter().close();
  28.      } finally {
  29.          em.close();
  30.      }
  31.   }
  32.  }
  33. }


The smart rendering option, enabled during grid initialization, adds as parameters the starting position of the record (posStart) and the number of records to be returned (count). The doGet method processes these parameters plus sort parameters, if any, executes the query on the data store, and returns the retrieved rows as XML. 
Update operations are performed in the doPost method of the ControllerServlet :


  1. public class ControllerServlet extends HttpServlet {
  2.   @Override
  3.   protected void doPost(HttpServletRequest request,
                            HttpServletResponse response)
  4.      EntityManager em = EMF.get().createEntityManager();
  5.      try {
  6.         String action = "";
  7.         String id = request.getParameter("gr_id");
  8.         String type = request.getParameter("!nativeeditor_status");
  9.         Book book = new Book();
  10.         if ("inserted".equalsIgnoreCase(type)) {
  11.            action = "insert";
  12.            BeanUtils.populate(book, request.getParameterMap());
  13.            em.persist(book);
  14.            em.refresh(book);
  15.         } else {
  16.            Query query = em.createQuery("select from " + Book.class.getName()
                             + " where id = " + id);
  17.            book = (Book) query.getSingleResult();
  18.            if ("updated".equalsIgnoreCase(type)) {
  19.                action = "update";
  20.                BeanUtils.populate(book, request.getParameterMap());
  21.                em.persist(book);
  22.            } else if ("deleted".equalsIgnoreCase(type)) {
  23.                action = "delete";
  24.                em.remove(book);
  25.            }
  26.       }
  27.       if (!isEmpty(action)) {
  28.           response.setContentType("text/xml");
  29.           response.getWriter().print("<data><action type='" + action + "' sid='" + id + "' tid='" + book.getId() + "' /></data>");
  30.           response.getWriter().close();
  31.       }
  32.    } catch (Exception e) {
  33.        e.printStackTrace();
  34.    } finally {
  35.         em.close();
  36.    }
  37.  }


DHTMLX data processor component has its own protocol to exchange information with the server (additional information is available on DHTMLX website). This sample implementation, detects the operation triggered by the data processor and performs the appropriate data store operation.